Pickled Beets and Eggs
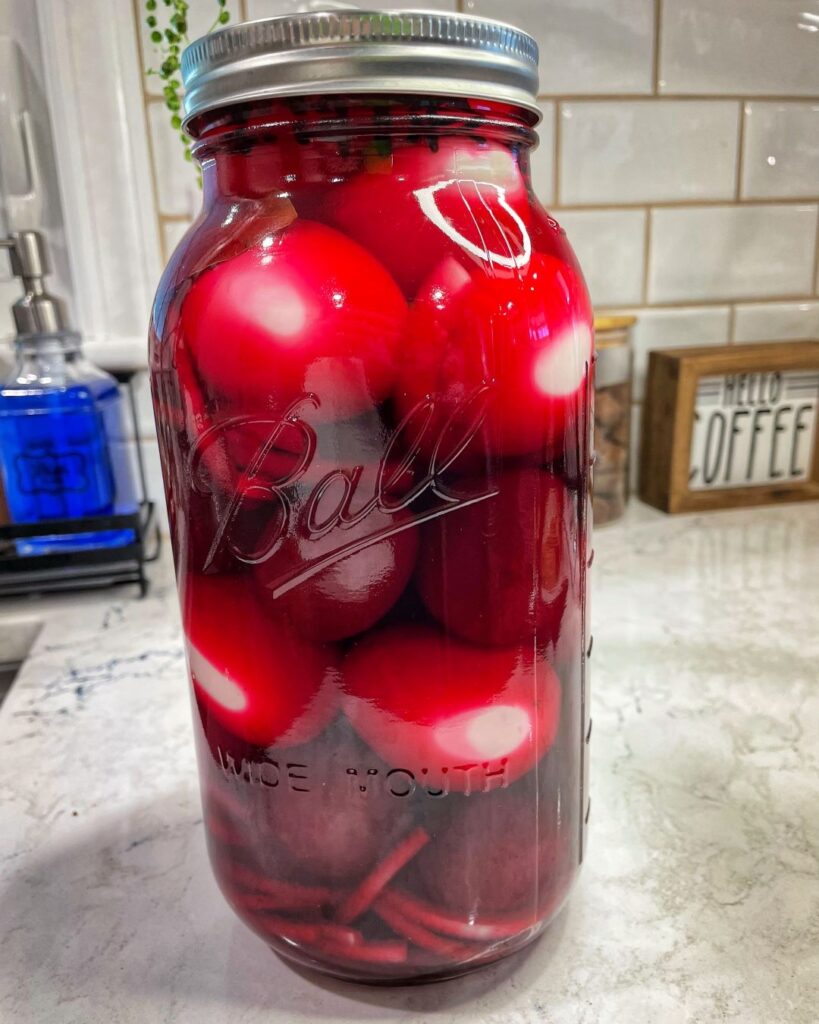
With Easter just around the corner, I start craving traditional family dishes. Baked ham, macaroni salad, and a must have on our table – Pickled Beets and Eggs! What are Pickled Beets and Eggs? Pickled Beets and Eggs is a traditional Pennsylvania Dutch/Amish recipe. It was originally a way for families to preserve eggs that could be eaten several days or weeks later. If you are not from the Pennsylvania area, they may not look familiar. When the eggs are pickled in the beet juice, they turn a gorgeous shade of magenta. Pickled eggs are a great snack, add-in for your salad, or as a bright addition to your charcuterie board. They are also a handy way to use up extra Easter eggs! There are many family recipes for pickled beets and eggs, each one is slightly different. Some recipes will call for cinnamon sticks, marjoram, various amounts of sugar, and other ingredients. Feel free to adjust the ingredients until you find the right blend of tanginess for you! I hope you try them! They are so good! How to Make Pickled Beets and Eggs Place eggs in a large pot and cover with cold water. Bring to a boil on high heat and reduce to medium heat. Boil for 12 minutes. Drain and fill the pot with cold water. Let eggs cool for 5 minutes, then peel. Next, slice the onion. Open the cans of beets and drain off the liquid into a separate bowl. Be careful not to splash – beet juice will stain counters and clothes! Layer onions, beets, and eggs in a large glass jar or bowl with a tight fitting lid. Add sugar, vinegar, cloves and bay leaf to the reserved beet juice. Carefully pour over the beets and eggs. Add up to an additional cup of water (if needed) to cover. Cover and refrigerate for at least 3 days before serving. *If you want the beautiful magenta color all the way to the yolk, wait 5 days. Try Some Other Pennsylvania Dutch Recipes! Pickled Beets and Eggs are a fun appetizer or snack. Easy to make with just a few ingredients! You might also enjoy
Korean Pork and Shrimp Dumplings (Mandu)

The first time I had mandu was when I was 25 and traveled to South Korea with my mom to meet her side of the family. It was a hot summer day and we walked from my aunt’s apartment up the street to a tiny shop with 3 tables inside. We sat down and my aunt ordered our dumplings at the counter. I was fascinated as I watched the people behind the counter roll out the dough, cut the circles for the wrappers, fill and decoratively fold the dumplings. Within a few minutes, they brought several plates of dumplings and various dipping sauces to the table. I was in heaven! Each bite was tender, slightly chewy, and full of flavorful fillings. It was THE BEST! For years after, whenever I had the chance, I would order mandu at the local restaurants. It wasn’t until I was in my 40’s that I ventured into actually making them. Now that I do, I love it! Making mandu isn’t difficult, but it does take some time. It’s worth it to make a large batch, so you can cook some and freeze some to enjoy later! The best part? You can customize the fillings to whatever flavors you prefer! One of my new favorites is butternut squash and kale dumplings (You may see that in an upcoming post!). For this post though, I am starting with a traditional pork and shrimp filling. If you don’t want to use pork, ground chicken is an easy substitute. This is a great recipe to make with a group of people. Time goes a lot faster when everyone is gathered around making dumplings and spending time together. I hope you enjoy this recipe as much as I do! How to Make Mandu Mix all the ingredients for the dipping sauce. Set aside. In a medium bowl, mix all ingredients for the filling until well combined. Set up your dumpling making station. Have a small bowl of water ready and a sheet pan lined with parchment paper. Remove one dumpling wrapper from the package and lay in your palm. Dip your finger into the water and moisten the edges of the wrapper. Spoon a heaping teaspoon of filling into the center of the wrapper. Fold the wrapper over the filling and press the wet edges to seal. Place dumpling on the sheet pan. Repeat with remaining wrappers and filling. (There will be about 40 in a package). Make sure the mandu are spaced far enough apart that they are not touching. Once done, you can prepare the dumplings or freeze them for use later. To Freeze Lightly cover the sheet pan with plastic wrap and place the dumplings in the freezer for at least 4-5 hours. Once frozen, you can transfer them to freezer bags. Dumplings will be good for up to three months in the freezer. Frozen dumplings can be steamed or boiled without thawing. To Steam Fill the bottom 1” of a large pot with water and place the steamer rack inside. Bring to a boil and add dumplings. Make sure they are not touching. Place the lid on the pot and steam for 13-15 minutes. Carefully transfer the dumplings to a dish and serve with dipping sauce. To Boil Fill a large pot with water and bring to a boil. Drop dumplings into the water and stir gently to keep them from sticking to the bottom. Boil for 13-15 minutes until they are floating and the filling is cooked through. Transfer to a dish and serve with dipping sauce. Notes You can find dumpling wrappers at your local Asian market or larger grocery stores in the freezer section. If you can only find square wonton wrappers, they will also work. You will just have a little extra wrappers on the edges. There are many ways to decoratively fold dumplings. Search for “How to fold dumplings” and you will find several videos and tutorials. Experiment and have fun! A traditional Korean dumpling filled with pork, shrimp, and cabbage that comes together in this tasty dish. Delicious fresh or freeze and save for later! You might also enjoy
