Black Bean and Corn Salad
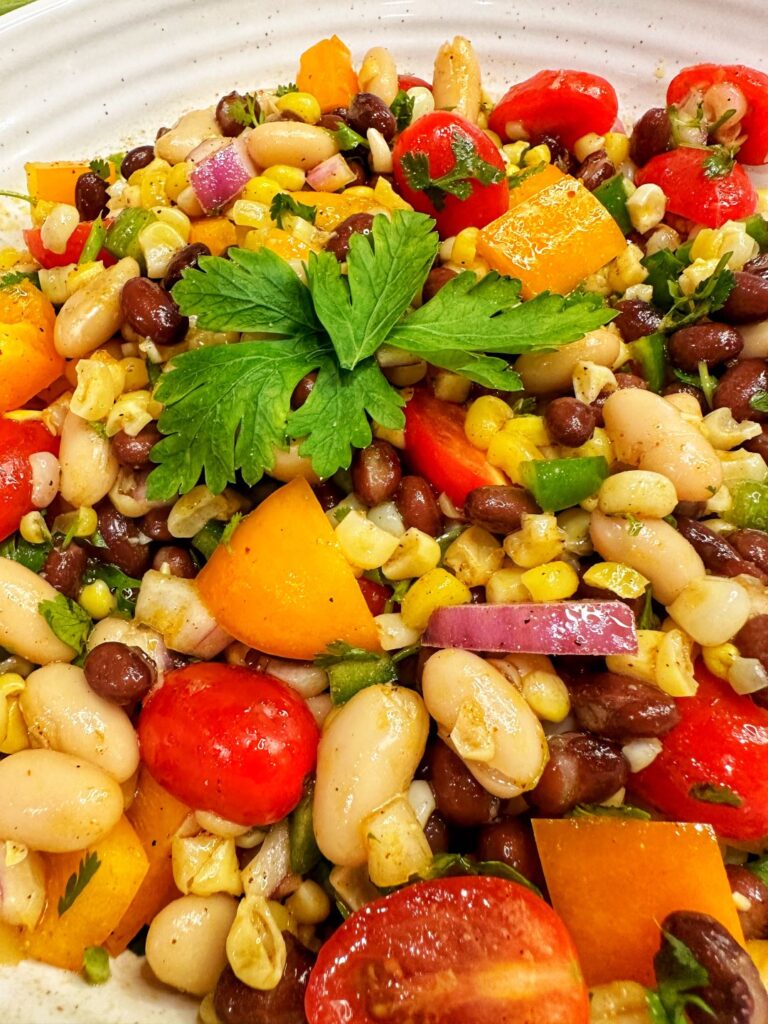
With Memorial Day around the corner, I was going through my favorite picnic recipes trying to decide which ones to share with you all. Black Bean and Corn Salad popped out at me! This salad hits all the right notes for a perfect side dish at a picnic. Colorful, crunchy veggies, creamy beans, and a refreshing, tangy lime dressing. Great as a side for some grilled chicken, steak, or serve as a chunky dip with some tortillas! I love this salad because it is so versatile and easy to make. Just browse through your pantry items and use what you have available. You can swap out the cannellini beans for a second can of black beans or pinto beans, add in fresh, diced avocado, or even add some fresh mango! 15 minutes and you are out the door and on your way to the picnic with an awesome dish! How to Make Black Bean and Corn Salad Place all of the salad ingredients into a large bowl. Toss lightly to mix. In a small bowl, add the olive oil, lime juice, honey, and spices. Whisk together. Pour the dressing over the salad and fold it in until well combined. You can serve this salad immediately or refrigerate until ready. Serving Suggestions: Recommended: With Memorial Day around the corner, I was going through my favorite picnic recipes trying to decide which ones to share with you all. Black Bean and Corn Salad popped out at me! This salad hits all the right notes for a perfect side dish at a picnic. Colorful, crunchy veggies, creamy beans, and a refreshing, tangy lime dressing. Great as a side for some grilled chicken, steak, or serve as a chunky dip with some tortillas! I love this salad because it is so versatile and easy to make. Just browse through your pantry items and use what you have available. You can swap out the cannellini beans for a second can of black beans or pinto beans, add in fresh, diced avocado, or even add some fresh mango! 15 minutes and you are out the door and on your way to the picnic with an awesome dish! How to Make Black Bean and Corn Salad Prepare all of your ingredients. Chop all of the vegetables. Place all of the salad ingredients into a large bowl. Toss lightly to mix. Dressing In a small bowl, add the olive oil, lime juice, honey, and spices. Whisk together. Assemble Pour the dressing over the salad and fold it in until well combined. You can serve this salad immediately or refrigerate until ready. Serving Suggestions: Great alongside grilled steak. Serve with BBQ chicken. Or serve as a dip with your favorite tortilla chips. Colorful, crunchy veggies, beans, and a tangy lime dressing makes for an easy and refreshing side dish! You might also enjoy
Easy 5-Minute Bruschetta

The weather in Northeast PA has been swinging back and forth from the mid-80’s down into the 40’s as we work our way through April. On those warm days though, I love spending time on our patio, soaking up the sunshine! That’s when I want bright, fresh appetizers! My go-to is Easy 5-Minute Bruschetta! Perfect for appetizers, great with grilled chicken! It literally takes me only 5 minutes to prepare. Appreciating life… I made this version of bruschetta right after I successfully finished all of my breast cancer treatment last summer. It was late July, hot and humid. I had a bit of time to myself and an overabundance of grape tomatoes growing in the garden. So, I made this Easy 5-Minute Bruschetta, sliced up some fresh mozzarella, and grilled a few crostini. I layered everything together and enjoyed it on the patio – grateful for the second chance on life that I had been given. For those of you that have gone through cancer treatment or a major life-altering event, you’ll understand what I mean. After surviving cancer, you really take the time to reflect on how important it is to enjoy the small things in life everyday. I hope you try my Easy 5-Minute Bruschetta and remember – enjoy the small things! How To Make Easy 5-Minute Bruschetta Tomatoes Rinse and drain grape tomatoes. Add to a food processor with the garlic cloves and pulse a few times until chunky but not puréed. Pour into a medium bowl. Dressing Add aged balsamic vinegar, olive oil, sea salt, and pepper. Mix to combine. BAsil Stack and roll the fresh basil leaves. Slice into thin ribbons. Add to the bruschetta. Mix to combine. Rest Stack and roll the fresh basil leaves. Slice into thin ribbons. Add to the bruschetta. Mix to combine. Serve Layer crostini with fresh mozzarella and a spoonful of bruschetta. Great for a light meal or appetizers! Recipe Notes Grill boneless chicken breasts and top with Easy Bruschetta for a Mediterranean inspired meal – my Bruschetta Chicken! Perfect summer appetizer made with fresh grape tomatoes, basil, and garlic! Serve with fresh mozzarella and crostini! You might also enjoy
Fresh Pineapple Salsa

The temperatures are slowly creeping up and there are signs of spring everywhere! Daffodils and tulips are peeking out. Grass is turning bright green. All those vibrant shades of yellow, red and green let us know things are coming back to life! That makes me crave bright, colorful foods like Fresh Pineapple Salsa! This pineapple salsa is great as a dip or as a topping for your favorite fish or chicken dishes! Bright and colorful, it is the perfect balance of sweet pineapple and little pops of heat from the peppers. I first made this when I made my Southwest BBQ Chicken Crunchwrap a few weeks ago. It was sooo good with the BBQ Chicken and cilantro lime crema! Then I swapped out the pineapple for fresh mangoes that I found at the grocery store to make Grilled Mahi Mahi over Easy Coconut Lime Rice. FABULOUS! I love the versatility of this salsa recipe! With just a handful of ingredients and 15 minutes of prep, it’s ready to enjoy! Try it as an easy appetizer to serve alongside your favorite chips! What Else Can I Make With Fresh Pineapple Salsa? How to Make Fresh Pineapple Salsa Combine the pineapple, onion, cilantro, and peppers. Add the lime juice and salt. Stir to combine. Taste and add additional lime juice or salt as needed. Set aside to rest for 10 minutes to allow flavors to blend before serving. Fun, colorful, pineapple salsa is a little sweet with a little heat! Ready in just a few minutes! You might also enjoy
Easy Basil Oil

I love when my food has bright, vibrant colors! It’s a sign of FRESH, wholesome ingredients that are good for me to eat. Easy Basil Oil is packed full of nutrients, flavor, and adds so much punch to your favorite dishes! I had a large bunch of beautiful basil on the windowsill that I needed to use and found this awesome recipe from www.skinnytaste.com! I made some small changes since I prefer sea salt. It’s so simple and quick – it was a perfect way to use my basil! Drizzle this on your favorite pasta, on your omelets, or use as a dipping sauce! Soo good! How to Make Easy Basil Oil Place basil, water, garlic, salt and red pepper flakes in a mini-food processor. Pulse to break down the basil and garlic. Add the olive oil and pulse until you have a smooth sauce, scraping down the sides as needed. Drizzle on your favorite pasta, omelets, or just use as a dipping oil! Easy Basil Oil is flavorsome and aromatic! Drizzle over pasta, omelets, or use a dipping oil for fresh bread!
Orange, Walnut, and Arugula Salad
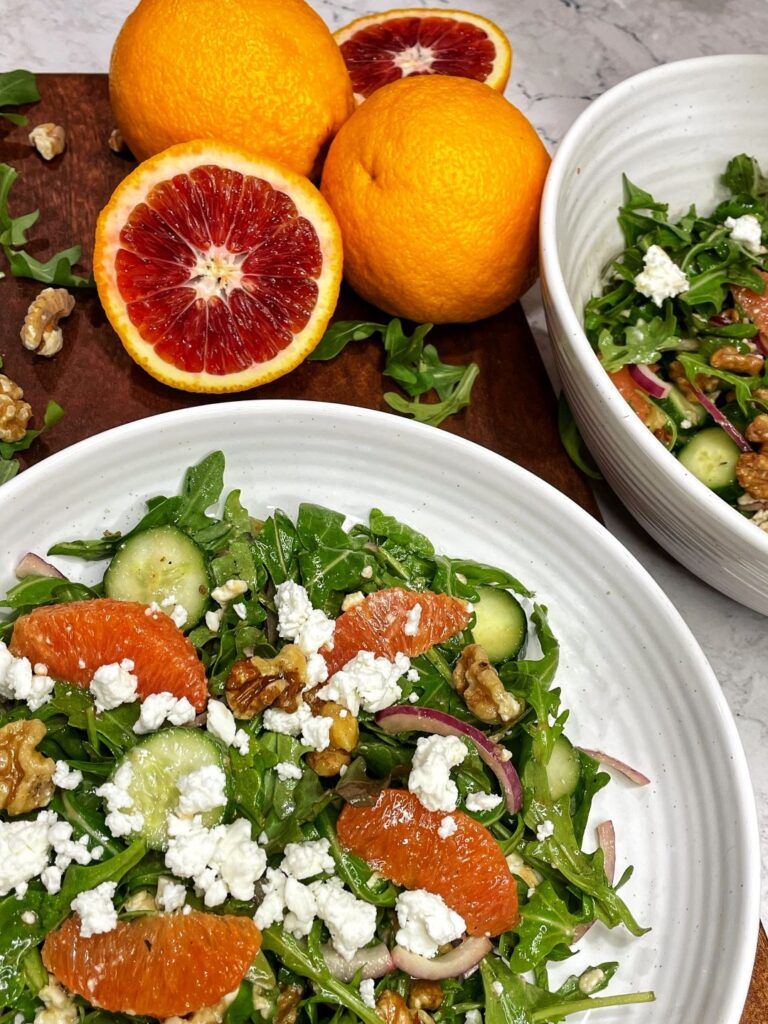
This Orange, Walnut, and Arugula Salad is bright, vibrant, and healthy! With my Blood Orange Balsamic Dressing, its happy spring flavors brighten a winter day! One of the things I struggle with in the winter is to strike a balance between comfort food and healthier eating. That’s when I start grazing the produce section of my local grocery to see what is in season. And you know what is in season in January? Oranges! There are many wonderful varieties of citrus available at this time of year. Some of my favorites are blood oranges, Cara Cara, and Sumo oranges (these are delicious for eating)! Choose what looks freshest. This week, the blood oranges looked Ah-Mazing! So I grabbed a bagful and brought them home. When I constructed this salad, I wanted a variety of textures and flavors, as well as a big flavor punch. I opted for the baby arugula for its peppery bite, some crisp cucumber and thinly sliced red onion, and tangy feta cheese. I added in beautiful blood oranges for sweetness and toasted walnuts for some healthy fats and that great nutty flavor. To bring all the flavors together I topped it with my absolute favorite Blood Orange Balsamic Dressing. Happiness in a bowl! How to Make Orange, Walnut, and Arugula Salad Prepare all of your ingredients. Chop and slice the cucumber and red onion. Peel and segment the oranges. Toast Walnuts Heat a dry, small pan over medium heat. Add your walnuts in a single layer. Heat the walnut halves, tossing frequently, until they get a nice, nutty aroma and are slightly browned, about 5 minutes. Watch carefully – they can go from beautifully toasted to burnt very quickly. Combine Combine ingredients in a large bowl. Pour the Blood Orange Balsamic Dressing over the top. Toss well to combine. Serve Serve immediately and enjoy! Substitutions If you can’t find blood oranges, substitute navel oranges or Cara Cara. Dressing If you can’t find blood oranges, substitute navel oranges or Cara Cara. Nuts Swap out the walnuts for almonds or pecans – they would be delicious too! Orange, Walnut and Arugual Salad is bright, vibrant and healthy! Its happy spring flavors brighten a winter day! You might also enjoy
Whipped Feta and Balsamic Cherry Dip
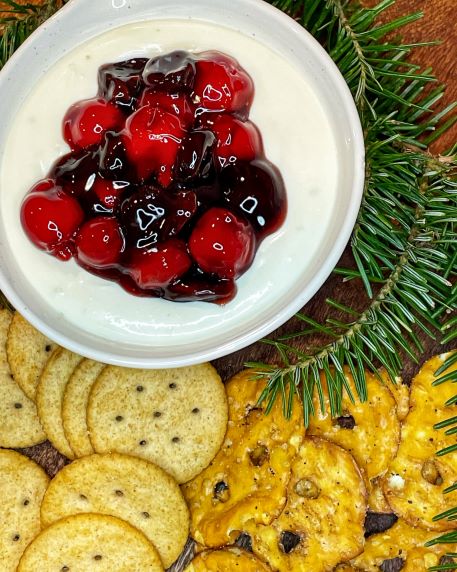
I love appetizers. It is a known fact in our family. If given the choice to have an entrée vs. several small plates, I’ll choose several small plates every time. It’s something about having a wide variety of dishes to choose from – I’m hooked! Maybe because I’m half Korean??? Korean meals are often served with several small side dishes called banchan, but that is a lesson for another day. I digress. Lol! When you need effortless appetizers, this dip is perfect! Easy to make, beautiful presentation, and most important – DELICIOUS! How to Make Whipped Feta and Balsamic Cherry Dip Balsamic Cherry Topping Add Add one cup of cherry pie filling, the dried cherries and the balsamic glaze to a small bowl. Mix well and set aside. Premium Cherry Pie Filling Try to use a premium cherry pie filling that does not have high fructose corn syrup. You will get a richer, cherry flavor. Whipped Feta Dip Soften cheese Set feta cheese and cream cheese out on the counter for at least an hour to come to room temperature. *This step is important – if your cheese is cold, it won’t be smooth and creamy when you whip it. Blend Add both cheeses to your food processor. Pulse a few times to start to combine the cheeses. Add the lime zest. Pulse again to combine. Add the water, a tablespoon at a time, until the dip is whipped and fluffy. *If you prefer a sweeter dip, add honey.* Spread dip Spread the whipped feta on a small serving dish or shallow bowl. Top with the balsamic cherry topping. Cover and refrigerate You can cover and refrigerate until you are ready to serve. Let it come to room temperature – approximately 30 minutes. serve Serve with Ritz crackers, pretzel crisps, or your favorite dippers. Whipped feta dip with a delicious balsamic cherry topping! You might also enjoy
