Pan Seared Pork Chops with White Balsamic Honey Glaze
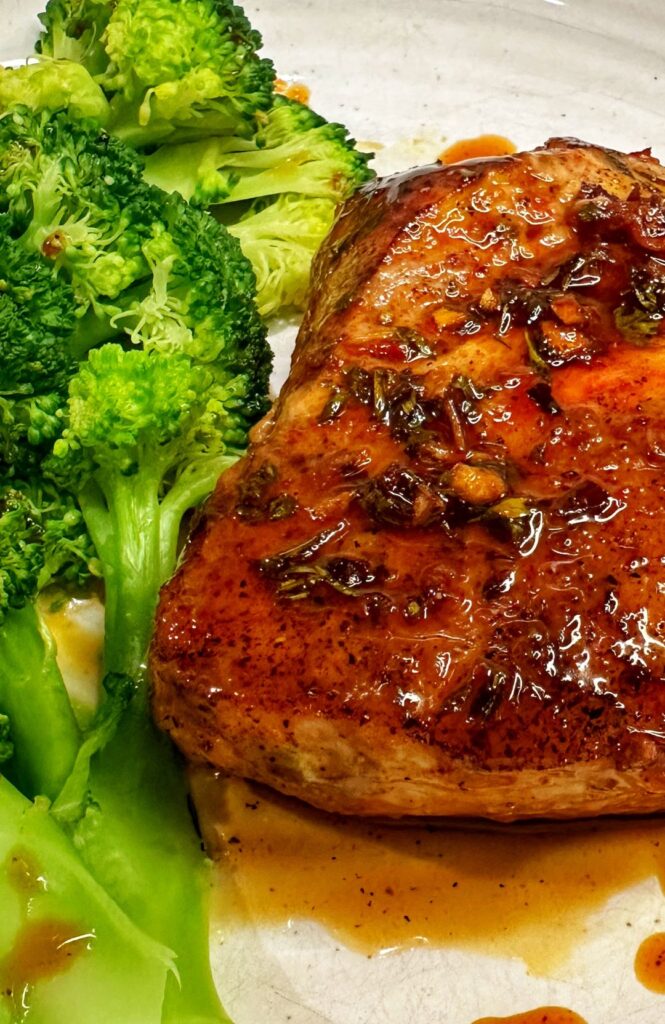
I love making all day meals, but we often have a crazy busy schedule and need to get dinner on the table in a hurry. Pan Seared Pork Chops with White Balsamic Honey Glaze is perfect – 15 minutes and you have a restaurant quality meal! The pork is seasoned, quickly seared and finished in the oven. The glaze is added right at the end and is glossy, tangy, and sweet. The result is a gorgeous, juicy, savory pork chop. It will look like you spent hours in the kitchen, but you only needed a few minutes! Add some seasonal veggies like my Holiday Roasted Vegetable Medley on the side and dinner is ready! How to Make Pan Seared Pork Chops with White Balsamic Honey Glaze Preheat the oven to 400°F. Pat the pork chops dry. Season with the smoked paprika, salt, and pepper on both sides. Whisk the ingredients except the butter for the glaze in a small bowl. Set aside. Heat an oven safe skillet over medium heat. Add the olive oil and swirl to coat. Add the pork chops. Sear for 2-3 minutes on each side until well browned. Flip one more time and place in the oven to finish cooking. Cook in the oven for approximately 6-8 minutes until the internal temperature of the pork chops is 145°F. Remove the pork chops and cover loosely on a plate to rest. Add the glaze to the hot skillet over medium low heat. Simmer for 3-5 minutes until it cooks down slightly. Add in the butter and swirl in. Juicy, tender pork chops – pan seared and finished with a white balsamic honey glaze
Roasted Butternut Squash Bisque (with Maple Cream)

This past Saturday, it was cold, rainy, and dreary. The kind of day where you want to cozy up on the couch in your sweats with a fuzzy blanket and eat a warm bowl of soup. I’m not talking about watery canned soup – I’m talking about a thick, creamy soup that is hearty AND healthy. What I developed is a luscious Roasted Butternut Squash Bisque loaded with butternut squash, carrots, apples, and roasted garlic. Inspiration from @platingsandpairings! I added some warm fall spices and a lightly sweetened maple cream drizzle that makes this soup feel like a warm hug in a bowl! To make sure it is a good recipe, it has to pass the husband test. My hubby can be a bit skeptical of soups. He grumbles that they aren’t “filling” and that he is starving an hour later. Well, not this time. This soup is husband approved! I added a simple grilled cheese sandwich on the side for dunking and he was a happy man! How to Make Roasted Butternut Squash Bisque Preheat the oven to 425°F. Line a large rimmed baking sheet with parchment paper. Spread the butternut squash, carrot, apple, and onion on the sheet. Cut the top off of the head of garlic and place on the sheet. Drizzle olive oil over the vegetables and toss lightly to coat. Season with salt and pepper. (I also like to add a few sprigs of fresh thyme) Working in batches, place half of the roasted vegetables and 2 cups of broth in a blender or food processor. Puree until smooth. Transfer to a medium stockpot. Repeat with the second batch of roasted vegetables and remaining 2 cups of broth. Heat the stockpot over medium heat until the soup is hot. Add the maple syrup and bourbon along with a ½ cup of heavy cream or coconut milk. Stir in the thyme, sage, cinnamon, nutmeg and ground red pepper until combined. Taste and add salt and pepper as needed. Maple Cream: In a small bowl, whisk together a ¼ cup of Greek yogurt and the maple syrup. To serve: Fill your soup bowl. Drizzle 1 Tbsp. of the maple cream over the soup and swirl it in. Garnish with a sprinkle of toasted pumpkin seeds. Enjoy! Is this bisque vegan? To make this recipe completely vegan, substitute coconut milk or cashew milk for the heavy cream and Greek yogurt. A luscious, rich soup with roasted butternut squash, carrots, apples, and garlic topped with a lightly sweetened maple cream. It's a hug in a bowl! You might also enjoy
My Favorite M&M Cookies
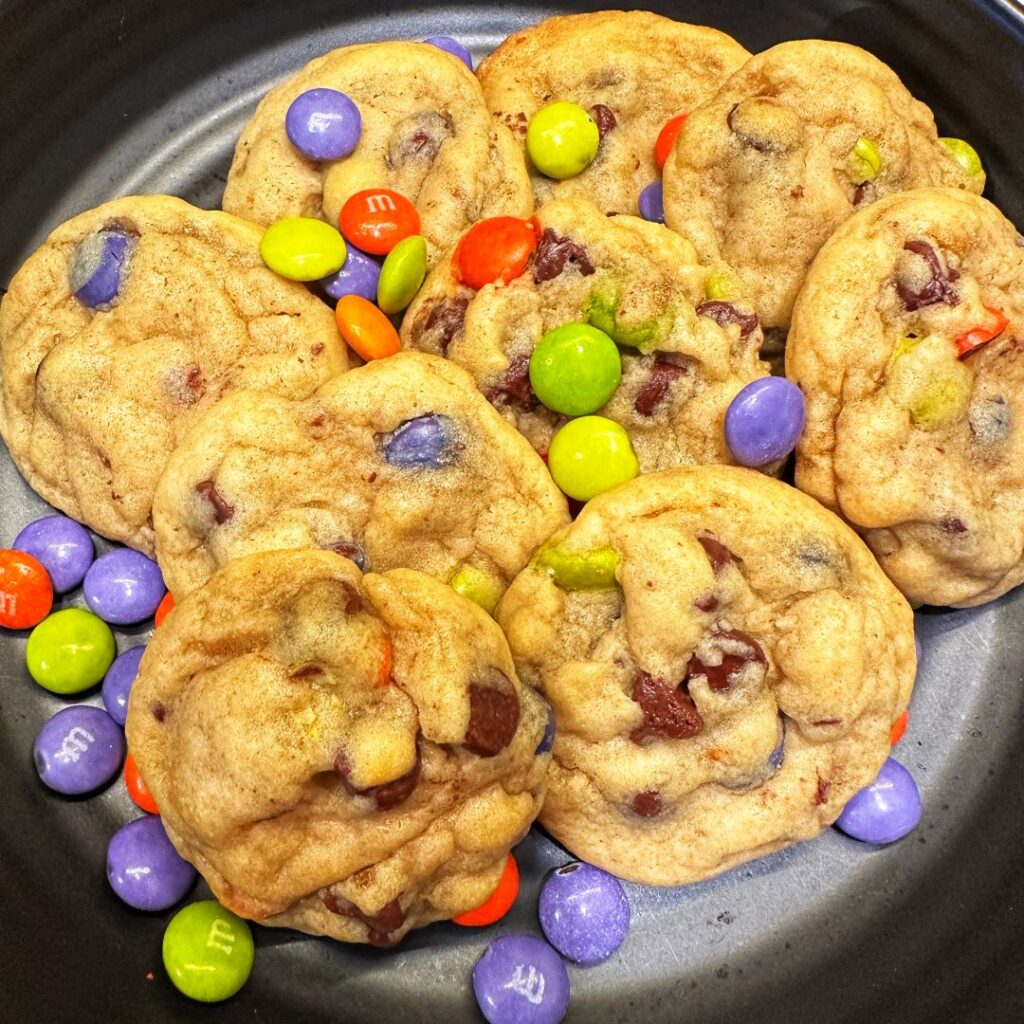
This week, the temperatures dropped into the 40’s and 50’s and overnight, the leaves turned beautiful shades of red and gold. Autumn is officially here. For me, it means it’s time for slow cooker meals, casseroles, and COOKIES! Today, I made My Favorite M&M Cookies. I love baking cookies and I research recipes like most people read novels! I came across this recipe on I Heart Naptime quite some time ago and have adapted it slightly over the years. This is a classic chocolate chip cookie recipe – the kind where the cookies have crisp edges and a delightfully chewy center. These cookies are studded with semi-sweet chocolate chips and brightly colored M&Ms. The fun part is you can use holiday themed M&Ms to change the colors throughout the year! Bakery Style I like to make these cookies about 3 inches, but they are also awesome as BIG cookies! If you want to make them much larger, like the ones you get at your favorite bakery, use a ¼ cup scoop and place on the cookie sheet 3” apart. Bake for 10-12 minutes. Cool for 2-3 minutes on the cookie sheet before transferring to a cooling rack. How to Make My Favorite M&M Cookies Wet Ingredients In a large bowl, cream butter, brown and granulated sugars together until fluffy. Add in the eggs and vanilla. Mix until just combined. Dry Ingredients In a separate bowl, whisk together the flour and baking soda. Turn the mixer on low and gradually add the dry ingredients to the wet ingredients until just combined. Fold and Chill Fold in the semi-sweet chocolate chips and M&Ms. Refrigerate the dough for 30 minutes. Preheat Preheat the oven to 375°F. Line two cookie sheets with parchment paper. Prepare to Bake Scoop cookie dough onto cookie sheets using a medium cookie scoop or measure out dough, 2 Tbsp. for each cookie. Place 2 inches apart. Add 3-5 extra M&Ms on top of each cookie. It’s Bake Time! Bake the cookies for 8-10 minutes until the edges of the cookies begin to turn golden brown. Cool the cookies on the sheets for 2 minutes to allow for carryover cooking. Transfer the cookies to wire racks to cool completely. Makes 24-30 cookies. Chewy cookies loaded with chocolate chips and M&Ms! These are everyone's favorites!
Vanilla Chai Zucchini Bars (with Brown Butter Cream Cheese Frosting)
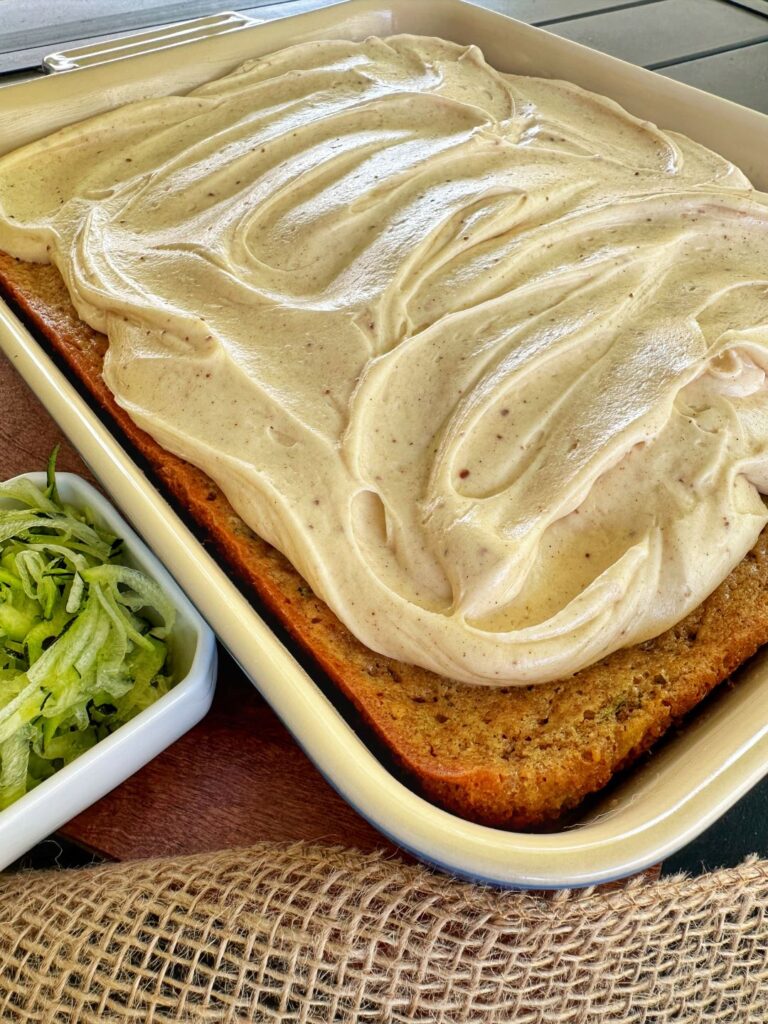
How did I come up with this recipe? One of my favorite drinks is a vanilla chai latte. There is something about vanilla and all of those wonderful spices that warms your soul. This was my inspiration as I scrambled to find creative ways to use up the zucchini from my garden. Speaking of gardens…is anyone else drowning in zucchini??? I have made all sorts of zucchini bread, zucchini boats, Crispy Baked Zucchini Fries, zucchini parmesan, and zucchini frittatas. All of my zucchini recipes were on repeat until I made this one! I wanted to make something other than zucchini bread or muffins. Bar cookies were my choice – they are not fussy and are easy to prepare. Bake and cut them into bars. Great to bring to a picnic or to pack for lunch. These zucchini bars are light and super moist because of the sour cream and are filled with all those warm chai spices that I love. The brown butter cream cheese frosting takes it over the top! Fluffy and light with specks of brown butter and vanilla bean. It’s hard to stop eating! Why use Brown Butter? Let’s talk about brown butter for a minute. I am a HUGE fan! It adds a beautiful nutty, salty flavor to whatever dish you are preparing. I’ve used it for baking, as a wonderful pan sauce for fish or chicken, and for pasta. It’s so versatile! To make it, all you do is warm butter over medium heat in a saucepan. Watch it carefully for 4-5 minutes until it melts, gets foamy, then turns a lovely caramel color. For more on how to brown butter, check out How to Brown Butter by Sally’s Baking Addiction. Not sure if it’s worthwhile? Try my Ultimate Brown Butter Chocolate Chip Cookies! It will make you a believer! How to Make Vanilla Chai Zucchini Bars Brown Butter Cream Cheese Frosting: Heat butter in a medium saucepan over medium heat. Whisk constantly. Butter will crackle, then foam. Watch your pan carefully. Within a couple minutes, the butter will turn a golden amber color and give off a nutty aroma. As soon as it turns golden brown, remove from heat. Pour into a medium bowl and let cool to room temperature. TIP *You can pour the butter into a heat safe bowl and put it in the refrigerator to solidify for 15 minutes. In a large bowl, use a hand held mixer or paddle attachment with your stand mixer and beat the brown butter, cream cheese, and vanilla bean paste on medium speed until smooth and creamy. Lower mixer speed to low and add the powdered sugar, one cup at a time. Mix until whipped and smooth. Set aside while you prep the zucchini bars. Zucchini Bars Preheat the oven to 350°F and grease a 9×13 pan. In a medium bowl, whisk together flour, baking soda, cinnamon, ginger, cardamon, nutmeg, and cloves. In a large bowl, whisk together the melted butter, sour cream, sugar, eggs, and vanilla extract. Once blended, fold in the grated zucchini. Gradually add the dry ingredients into the wet ingredients just until combined. Pour batter into the prepared 9×13 pan and spread evenly. Bake for 35-40 minutes until edges pull away from the sides and a toothpick inserted in the center of the bars comes out clean. Let cool in the pan for one hour. Once bars are completely cooled, spread the frosting over the bars in a thick layer. Refrigerate the bars until ready to serve. Cut into squares and enjoy! Vanilla Chai Zucchini Bars are light, moist, cakey bars with a pop of warm spices and creamy frosting.
My Favorite Hummus
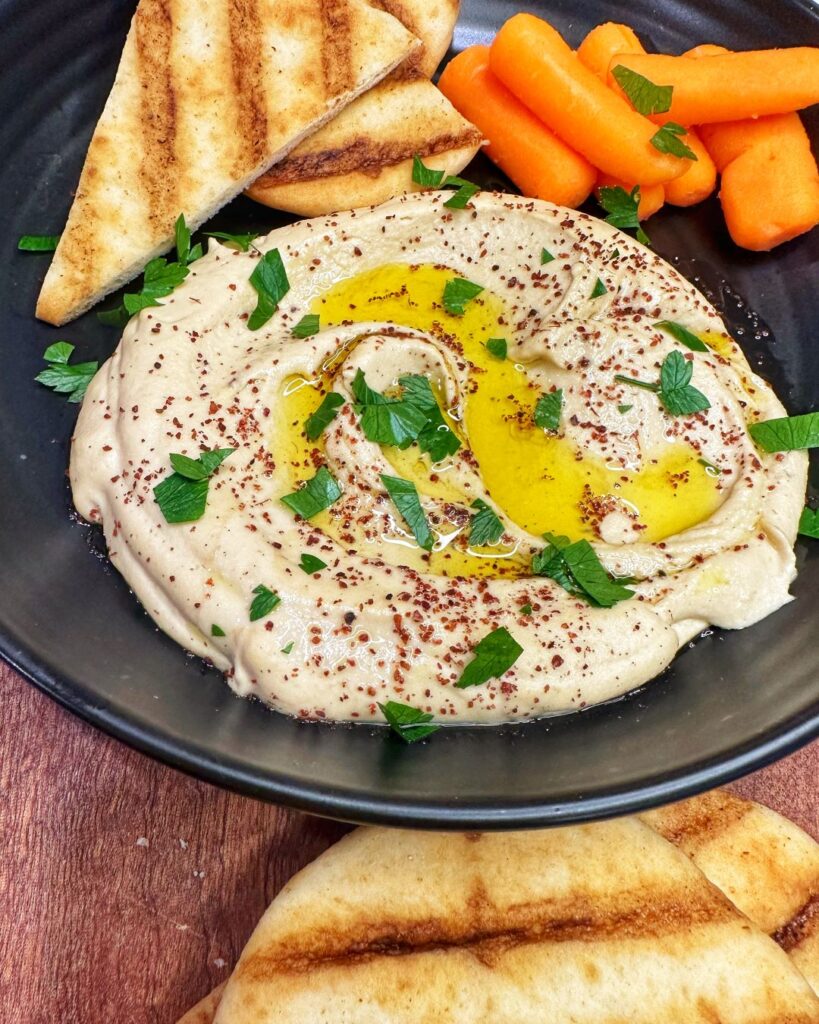
Right before Covid hit, my husband and I went to a wonderful Turkish kebab house with friends. It was very small, with only five or six tables. But the food! Wow! So incredibly fresh! We started with the house made hummus and it was so light and creamy – it just melted in your mouth. You couldn’t stop eating it. Once we got home, I was determined to learn how to make it. It took a long time to find a similar recipe, but now I can recreate My Favorite Hummus at home! I tried several recipes in the past, but they were always grainy, never ultra smooth with the creamy consistency that I wanted. Other recipes did create that creamy texture but were A LOT of work. You started with dried chickpeas that were soaked, cooked, and then peeled. Then I found a recipe for Best Hummus on Cookie and Kate’s food blog along with helpful tips. To get the creamy consistency, you take canned chickpeas and simmer them for a few minutes with a pinch of baking soda. The baking soda makes the water alkaline, breaking down the pectin in the chickpea skins. This little secret is the difference between grainy hummus and ultra creamy hummus! The other tip I learned is that not all tahini pastes are equal. The thickness of the tahini varies greatly from one brand to another. With that in mind, you want to add enough ice water to your hummus to go from a thick paste to a luscious, light dip. That could be as little as one tablespoon or as many as five or six tablespoons. Don’t be afraid to experiment! Now, I can make My Favorite Hummus anytime. I love to serve it with fresh veggies, warm pita bread, or slathered on a wrap sandwich! Sooo delicious! How to Make My Favorite Hummus Put drained and rinsed chickpeas and baking soda in a medium saucepan and cover with at least 1” of water. Heat on medium high and bring to a boil. Reduce heat and simmer for 20 minutes until the chickpeas are very soft. Rinse and drain in a fine-mesh strainer and let cool. While chickpeas are simmering Combine lemon juice, garlic, and salt in a food processor. Process the mixture until the garlic is finely chopped Allow the mixture to rest. The lemon juice and salt will mellow the garlic so it is not overpowering. After a few minutes, add the tahini to the food processor Process 1-2 minutes until the tahini is whipped and creamy. Add in 2 Tbsp. of ice water and blend again for another 2 minutes.The tahini mixture should become very pale, creamy, and smooth. If your tahini was very thick, you may need to add an additional Tbsp. or two of ice water to get the smooth consistency. Add the cooled chickpeas and the ground cumin powder. Begin blending and pour in the olive oil. Blend for another 2 minutes until smooth and whipped. If it seems thick, add more ice water, a tablespoon at a time, until you achieve the desired consistency. Taste and add additional seasonings as needed. To Serve Pour the hummus onto a shallow bowl or platter. Use a large spoon and swirl the top. Drizzle with some extra virgin olive oil and add the garnishes you like the best. I love sprinkling ground sumac on top for an extra zing of lemon flavor! Serve with fresh veggies, warm pita bread, or pita chips. Appetizer Idea For a beautiful appetizer, serve the hummus with a simple Israeli salad on top. See recipe below. Israeli Salad 1 cup cherry tomatoes, chopped small 1 cup Persian or English cucumber, chopped small ¼ cup diced red onion 2-3 Tbsp. fresh lemon juice 2 Tbsp. chopped fresh parsley Salt and pepper Toss all of the ingredients together in a medium bowl. Serve on top of hummus with fresh pita. Homemade hummus that is better than the restaurant! Creamy, luscious, and easy to make! You might also enjoy
Turkey Sausage Stuffed Peppers
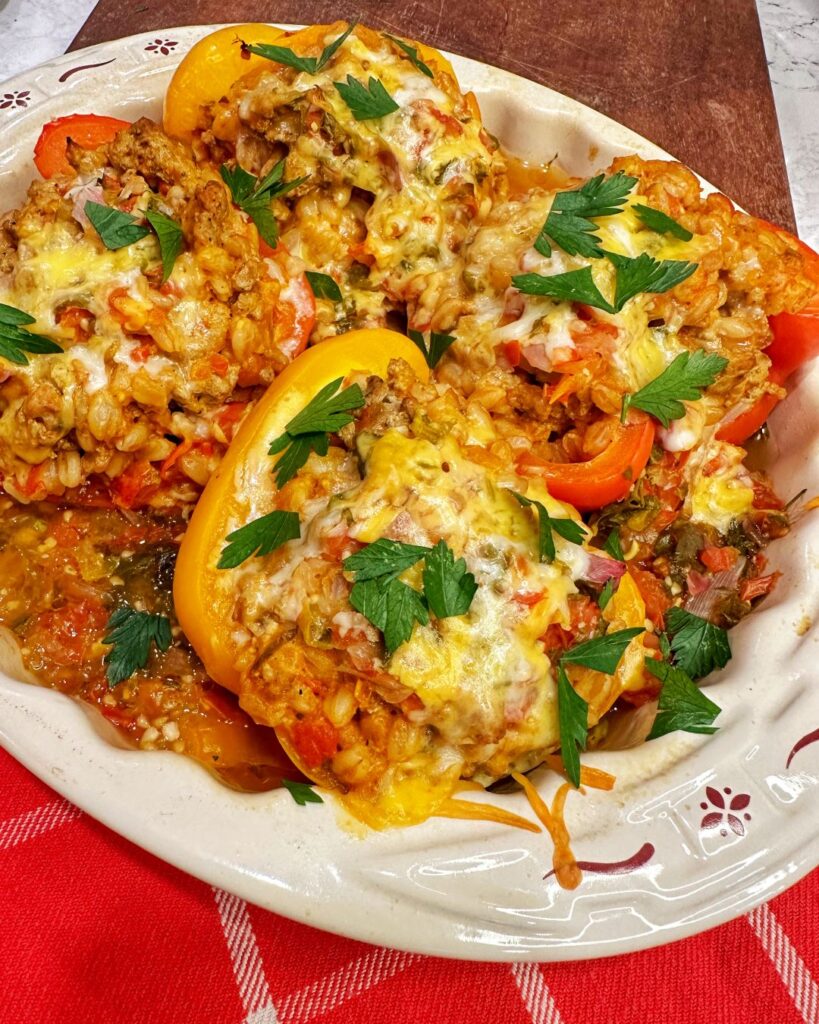
As a kid growing up, I was not a stuffed pepper fan. At all. It wasn’t until I was in my 30’s that I realized I really do like stuffed peppers, just not green stuffed peppers. Once I started making them with red, orange, or yellow sweet bell peppers, it was a complete game changer for me! Turkey Sausage Stuffed Peppers is one of my go to comfort food dishes. The turkey sausage and pico de gallo gives it a Tex-Mex spin, while the farro is a healthier alternative to white rice with its nutty flavor and chewy texture. This recipe is husband approved! While I am quite full with one half, my husband will eat two halves. He loves the heartiness and that it doesn’t “taste healthy.” Serve it with a fresh salad for a satisfying meal! What is Farro? Farro is an ancient grain that looks similar to wheat berries before it’s cooked. After cooking, it looks and tastes similar to barley. It is very nutritious, high in protein and fiber, and contains a wide range of antioxidants. Today, you can find it in most grocery stores next to the rice. You can even find it in convenient microwavable pouches for easy meal prep! How to Make Turkey Sausage Stuffed Peppers Prep Preheat the oven to 400° F. Spray an 8×8 baking dish with olive oil. Roast for 25-30 minutes until tender. Filling Heat a large skillet to medium and spray with olive oil. Add the turkey sausage and sauté for 4 to 5 minutes until cooked through, breaking it into large crumbles. Add the farro, 1/2 cup of shredded Colby Jack cheese, ½ cup of the pico de gallo, and V8 juice. Mix well and season with salt and pepper to taste. Assemble Cut the bell peppers in half lengthwise. Remove the ribs and the seeds. Add one cup of the pico de gallo to the bottom of the baking dish. Fill each of the pepper halves equally with the filling and place in the dish. Spoon the remaining pico de gallo on top of each pepper and sprinkle with 1 tbsp. of cheese on each pepper. Bake Cover tightly with aluminum foil and bake for 40-45 minutes until peppers are tender. Remove foil and let cool 5 minutes before serving. You might also enjoy Stuffed peppers filled with a hearty blend of turkey sausage and farro.
