Buffalo Chicken Burger
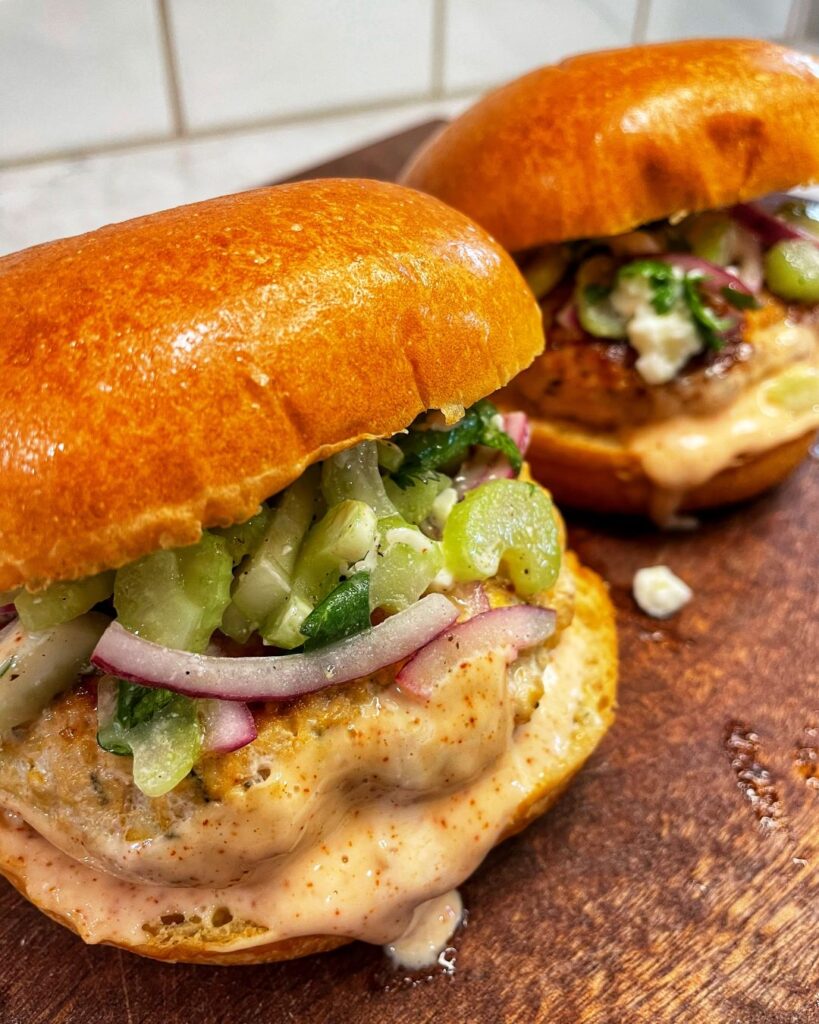
About a year ago, my mother-in-law shared a recipe from her Good Housekeeping magazine that I absolutely loved! It was a healthier version of a buffalo chicken burger. I want to share it with you today – I made a few adaptations to streamline prep time so you can have it on the table in 30 minutes. Trust me – you need to try this – you will not be disappointed! A thick, juicy chicken burger, packed with flavor, is tucked into a buttery brioche roll. Then it’s topped with a spicy mayo made with buffalo wing sauce and a crunchy celery slaw. Bite after bite, it is so good!!! Serve it with a side of my Crispy Baked Zucchini Fries and a side of spicy mayo for dipping! Even my husband, who is a meat and potatoes kind of guy, loves this meal! How to Make Buffalo Chicken Burgers Prepare the Spicy Mayo In a small bowl, mix together the mayonnaise, lemon juice, buffalo sauce, honey and cayenne pepper. Set aside. Prepare the Celery Slaw In a medium bowl, toss the celery, onion, and parsley together. Add the olive oil, vinegar, and lemon juice. Mix well. Fold in the feta cheese. Add salt and pepper to taste. Set aside. Prepare the Buffalo burgers In a medium bowl, add the ground chicken, Buffalo sauce, onion powder, garlic powder, thyme, and red pepper flakes. Gently combine. Form into patties (3- ⅓ lb. patties or 4- ¼ lb. patties). Cook Heat a large non-stick skillet on medium heat. Add a drizzle of olive oil. Then add the burger patties. Cook burgers until browned, about 3-4 minutes. Carefully flip and brown the other side for another 3-4 minutes until cooked through (165°F). Assemble Spread spicy mayo on the top and bottom of the buns. Slide the Buffalo burger on the bottom bun. Add the celery slaw and the top bun. Enjoy! A thick, juicy chicken burger packed with flavor is tucked into a buttery brioche roll and topped with spicy mayo and a crunchy celery slaw. Bursting with Buffalo wing flavor! You might also enjoy
Immune Boosting Chicken Noodle Soup
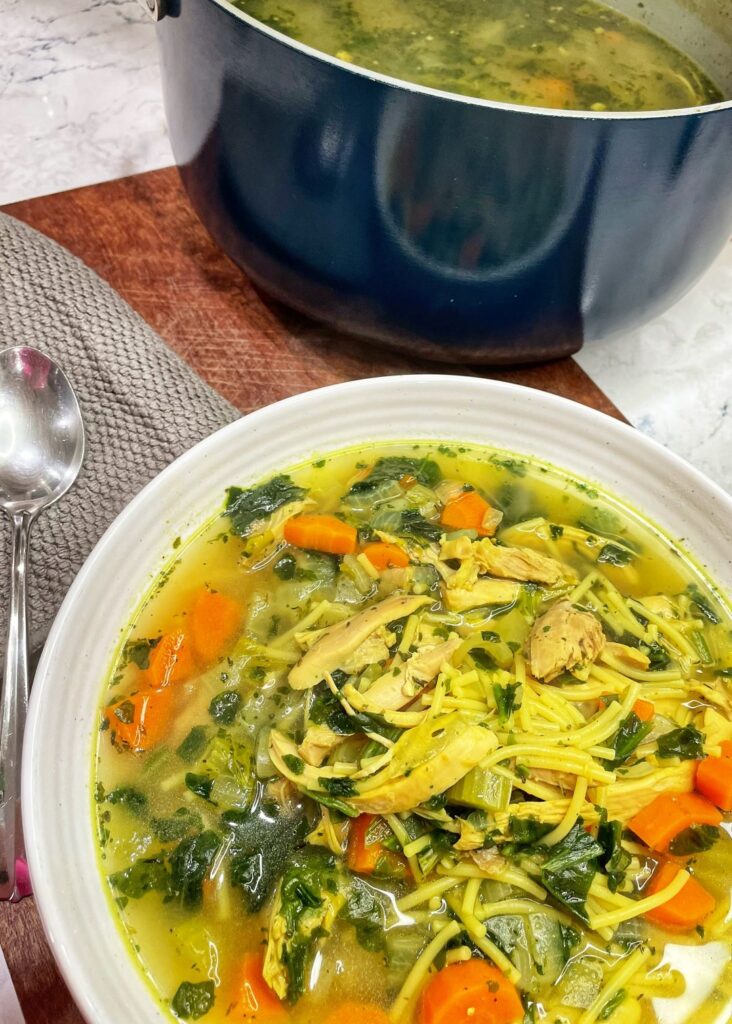
My family loves chicken noodle soup – especially on a cold, snowy day! When my kids were smaller, nothing was more comforting than a big pot of soup simmering on the stove all afternoon while the kids were building snow forts and sledding. They would troop into the house, all snowy and wet. As soon as they got inside, they would smell the soup simmering and, with a hopeful look, ask if it was ready. I would peel all the wet layers of hats, gloves, boots, and jackets off and set them down at the table. As soon as that bowl of steaming soup was in front of them, they would taste that first spoonful and grin. I still picture those rosy faces slurping up all that chicken noodle goodness! Fast forward to 2021. I was diagnosed with breast cancer and underwent an aggressive treatment plan. I battled breast cancer and won. One of my weapons of choice was food. Healthy foods helped keep up my strength during chemotherapy, helped me heal after surgery, and helped reduce inflammation after radiation. In particular, there was an amazing mineral broth recipe my friend shared that I drank on a regular basis. Made from tons of vegetables and kombu, it was nutrient dense, with tons of natural electrolytes, yet gentle on your stomach. Perfect for those days after chemo when you were nauseous but still needed to eat to keep up your strength. It worked better than Ensure, or any of the various electrolyte drinks doctors suggested. Now, I am always finding ways to boost the health impact of my recipes. My Immune Boosting Chicken Noodle Soup does take a couple hours to prepare – I worked in some of the mineral broth ingredients – but I promise you it is totally worth it! It has all the feel good noodles, some simple additions that add great health benefits, AND tastes awesome! What are the health benefits? Chicken thighs vs. Chicken breasts Dark meat chicken contains vitamin K2 (menaquinone), a naturally occurring, fat-soluble vitamin that has antiangiogenic properties. What does that mean? A lot. Vitamin K2 helps suppress the growth of new blood vessels needed by cancerous tumors to grow and metastasize. Eating K2 rich foods can significantly reduce your chances of dying of heart disease. It also interferes with the body’s ability to make cholesterol and can prevent hardening of the arteries. Kombu Kombu is a type of thick, flat seaweed commonly used in Asian cooking. You can find it in your local Asian markets or on Amazon, dried and packaged in large strips. It has a wonderful umami flavor and is often used in Dashi broth for ramen bowls. It is a nutritional powerhouse; high in iron, calcium, and vitamins A and C. The amino acids in kombu also help your body to break down and digest food easier. Turmeric Tumeric has an active ingredient, curcumin, which has both antioxidant and anti-inflammatory properties. Rich in phytonutrients, turmeric protects the body by neutralizing free radicals and preventing cell damage. Diets rich in plant-based foods with lots of phytonutrients are associated with the prevention of conditions such as cancer and heart disease. Can you see why I like this soup so much??? How to Make Immune Boosting Chicken Noodle Soup Prepare the Stock Cut carrots, celery and onion into large chunks. These veggies are to add depth and flavor to our stock. Place the chicken thighs in a large stockpot. Add the carrots, celery, onion, bay leaf and kombu. Cover with about 10 cups of water. Turn heat to high and bring to a boil. Reduce heat and simmer for 45 minutes. As the chicken simmers, occasionally skim off the foam. Prep Veggies and chicken While the stock is simmering, peel and slice the carrots, slice the celery, and chop the onion. Once the chicken is cooked through, pull it out and let cool enough that you can shred the chicken and set aside. Scoop out the carrots, celery, onion, kombu and bay leaf from the stock. Discard. Prepare the Chicken Soup Add 3-4 more cups of water. Add the carrots, celery, onion, thyme, parsley, turmeric, black pepper, and bouillon. Bring the stock back up to a boil, then reduce heat and simmer for 30 minutes, stirring occasionally. Simmer and Serve Add the shredded chicken back in along with the pasta and chopped spinach. Simmer for an additional 6-8 minutes until pasta is cooked. Add additional salt and pepper to taste. Enjoy! Immune Boosting Chicken Noodle Soup is filled with healthy ingredients, feel good noodles, and tastes awesome! Health Benefits You might also enjoy
Easy White Chicken Enchilada Skillet
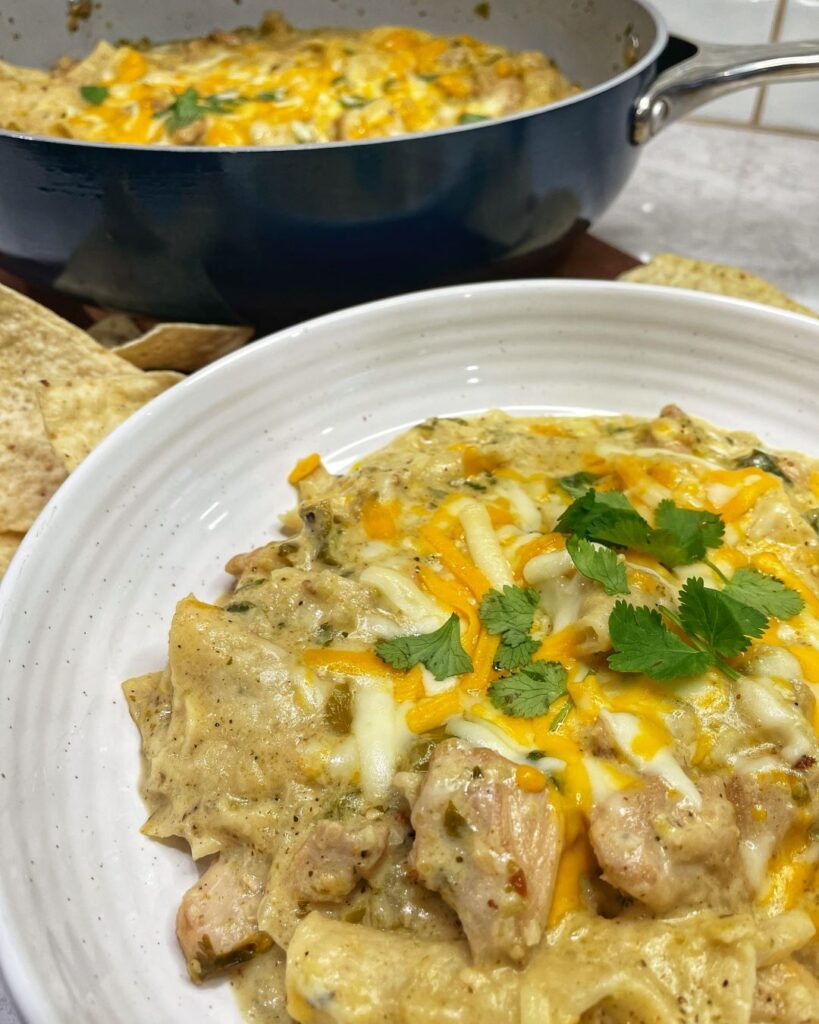
Years ago, when I was a child, one of my favorite places to eat was Chi Chi’s. Do you remember that Mexican chain restaurant? They would start you out with tortilla chips and fresh salsa. Then they would bring out those huge platters steaming with refried beans, chimichangas, enchiladas, and Mexican rice. Everything was coated in luscious, melty cheese and it was delicious! Since then, my tastes have changed somewhat. I still love those big platters, but I want fresher ingredients that aren’t so salty that I’m bloated for days. I’m also realistic – I don’t always have time to spend the whole afternoon in the kitchen making dinner. I need something wholesome and flavorful to serve my family. That is how this one pot meal, White Chicken Enchilada Skillet was born! Join me as I share how to make salsa verde and the chicken skillet meal from scratch. But, if that seems like it’s too much, I’m also going to share the 30 Minute Express Dinner version that can have your meal for 6 people on the table in under a half hour! You control the ingredients and it is gluten free! Please let me know if you like the recipe in the comments! Enjoy! How to Make Easy White Chicken Enchilada Skillet Prepare the Salsa Verde Preheat Preheat the oven to broil and line a rimmed baking sheet with aluminum foil. Roast Veggies Peel husks off of the tomatillos and rinse well. Halve and place cut side down on the baking sheet. Cut the stem off of the jalapeño and halve. Remove seeds and ribs if you prefer a milder salsa. Place on the baking sheet with the tomatillos. Broil for 8-10 minutes on the middle rack until the skins start to blister and turn black. Remove from the oven and cool briefly. Blend Put tomatillos and any juices on the baking sheet, jalapeño, garlic, onion, cilantro, salt, and lime juice in a blender or food processor. Pulse several times until well blended. Cool Set aside. It will thicken as it cools. This can be made a day ahead and will keep in the refrigerator for up to a week. Prepare the Easy White Chicken Enchilada Skillet: Brown Chicken Heat 1 Tbsp. olive oil in a large, deep skillet over medium-high heat. Add the chicken and season with salt and pepper. Let brown for 2-3 minutes. Toss and let brown for an additional 2-3 minutes, then remove from the pan. Add onion and spices Lower the heat to medium. Add the onions and sauté for 3-4 minutes until translucent. Add the spices (coriander, cumin, oregano, salt, and pepper). Mix in well. Deglaze pan Deglaze the pan with the chicken stock, scraping up the brown bits. Add the salsa verde and the chicken. Bring to a boil, then reduce heat and simmer for 8-10 minutes. Add Sauté, breaking it up and cooking until no Add 1 cup shredded cheese, coconut cream, cilantro, and tortillas. Mix well. Simmer for an additional 3-4 minutes. Turn off the heat. Broil Add the remaining 1 cup of shredded cheese to the top. You can broil for 3-4 minutes to melt the cheese or cover with a lid on the stovetop until the cheese melts. GArnish Garnish with additional cilantro and serve in bowls with tortilla chips on the side. Quick Salsa Verde Skip making the salsa verde and use a good quality store bought brand. No time for chicken Substitute 4 cups of shredded rotisserie chicken and skip sautèing the chicken Dinner in 30! Dinner will be ready to go in less than 30 minutes! One pan Easy White Chicken Enchilada Skillet makes dinner time fast and easy! A family favorite! You might also enjoy
Southwest BBQ Chicken Crunchwraps
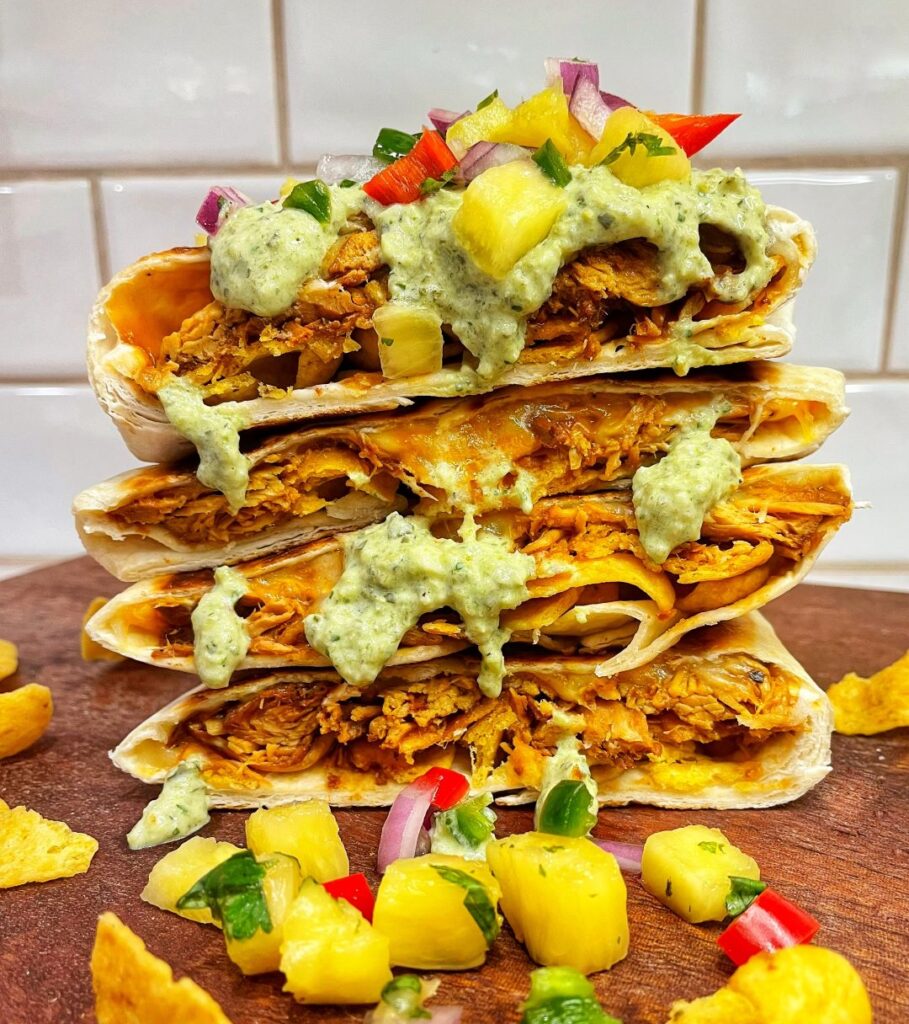
My husband loves all things spicy and crunchy. So I created this spinoff of a Taco Bell Crunchwrap using juicy BBQ chicken, gooey Colby Jack cheese, and Fritos, topped with a beautiful green Roasted Poblano Crema and bright, fresh Pineapple Salsa. It’s the perfect balance of sweet, tangy, crunchy, and slightly spicy. You can make everything ahead of time so when you are ready for crunchwraps, it is only a few minutes until it is hot and crispy on your plate! Great for a casual weekend meal! How to Make Southwest BBQ Chicken Crunchwraps Prepare the Roasted Poblano Crema: Broil Set the oven to broil. Line a rimmed baking sheet with parchment paper. Slice the poblano peppers in half and remove seeds and ribs. Lay skin side up on the baking sheet. Place in the oven on the middle rack and broil for 5-6 minutes. Watch closely to prevent burning. You want the skins to blister. STeam Remove the peppers and place in a bowl covered with plastic wrap for 15 minutes to steam. The steam will loosen the skins. Peel off the skins and roughly chop up the peppers. Blend Place peppers, onion, garlic, cilantro, and Greek yogurt in a blender or food processor. Purée until fairly smooth. Add 1-2 Tbsp. of milk to thin out, if needed. Season with salt and pepper to taste. Set aside. Prepare the Pineapple Salsa: Chop and Toss Toss all of the ingredients in a medium bowl. Season with salt to taste. Set aside. Prepare the Crunchwraps: Layer Lay a burrito size flour tortilla flat. In the center, add ½ cup of shredded Colby Jack cheese. Top with ½ cup BBQ chicken and a handful of Fritos. Fold Start folding the side of the tortilla closest to you towards the center. Using both hands, fold the edges down and rotate clockwise, little by little as you continue folding. You should be able to fully fold and cover the top of the crunchwrap with about 5-6 folds. Brown Heat a nonstick skillet over medium heat. Drizzle with a little high temperature cooking oil. Carefully place the crunchwrap seam side down, pressing lightly to help seal the seams. Cook for about 2 minutes until golden brown. Carefully flip the crunchwrap and cook the other side for another 2 minutes until golden brown and crispy. Assemble Assemble and cook the remaining wraps. Cut and serve! Transfer the Southwest BBQ Chicken Crunchwraps to a cutting board. Cut in half and drizzle with the Roasted Poblano Crema and top with a few spoonfuls of Pineapple Salsa. Enjoy! Juice BBQ chicken, Colby Jack cheese and Fritos stuffed inside a crispy flour tortilla, topped with roasted poblano crema and fresh pineapple salsa! You might also enjoy
Lasagna Soup
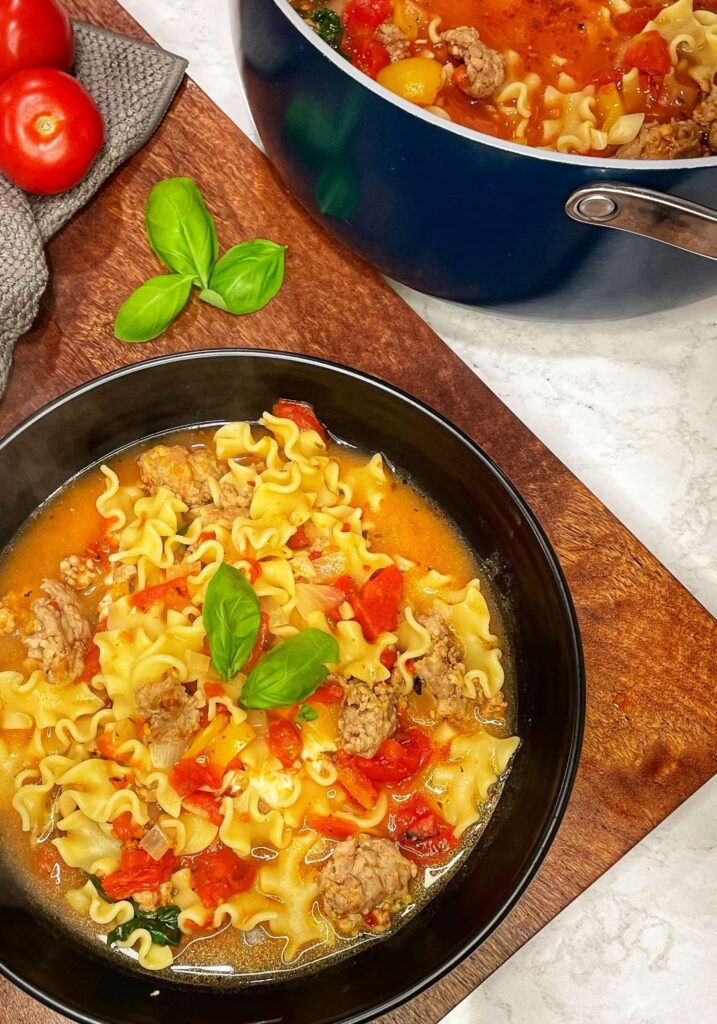
Lasagna Soup is the PERFECT comfort food for a cold winter day! EASY to make, you can have this on the table in less than an hour. Filled with creamy ricotta, perfect bites of sausage, and mini lasagna noodles – it is so cozy! Our family loves soup and this is the MOST frequently requested! I’ve made this for years and now, our oldest kids, in their 20’s, ask for the recipe so they can make it for their friends and roommates. Another reason I love this soup is because it is so flexible. If you don’t have a bell pepper, add 2 onions instead of one. Don’t like pork sausage? Use a good Italian chicken sausage. Can’t find mafalda pasta? Use fusille or farfalle. Make it with your family’s tastes in mind and they will love it! When you stir together the cheese and that lovely tomatoey broth, it turns into a wonderful, cheesy bowl of perfection! Sooo yummy! I can’t wait for you to try it! How to Make Lasagna Soup Prepare cheesy filling In a medium bowl, mix together the ricotta, Parmesan, salt and pepper. Set aside. Brown Sausage and onions Heat a drizzle of olive oil in a large pot over medium heat. Add sausage. Break into bite sized pieces and brown for about 5 minutes. Drain fat as needed. Add in onions and peppers, cook until translucent, about 5-6 minutes. Add garlic, oregano, and red pepper flakes. Stir through. Add tomato paste and mix well. Cook for 3-4 minutes until tomato paste turns rusty brown. add tomatoes and stock Add diced tomatoes, bay leaves, and chicken stock. Bring to a boil and then reduce heat to simmer for 30 minutes. Boil Pasta In the meantime, bring water to boil in a medium saucepan. Cook mafalda pasta according to the directions on the package. Drain and set aside. Add basil and pasta to soup Add fresh basil and pasta. Mix in until basil wilts – about 1-2 minutes. To serve To serve, scoop a large spoonful of the cheese mixture into each bowl. Ladle in hot soup and top with mozzarella cheese. Stir together to blend the creamy cheese into the soup for all of the deliciousness! Everything you love about lasagna in an easy-to-make soup! Cheesy, tomatoey, and lots of noodles! You might also enjoy
Pork and Shrimp Spring Rolls

One of my very favorite foods is a perfectly crispy spring roll! I do not eat many fried foods, but this is one that I cannot resist! There is something about that light, crispy wrapper with the savory pork and shrimp filling that is sooo good! Once you make your own, you will choose them over takeout every time! Do not get intimidated by the process – it’s a bit time consuming – but so worth it! Making spring rolls is a fun activity to do with friends and family. When everyone sits down to roll spring rolls, it goes quickly and you can make large batches and freeze them to be enjoyed later. I hope you’ll try it! How to Make Pork and Shrimp Spring Rolls 1. Prepare the Filling Slice and grate all of the vegetables. Set aside. Finely chop raw shrimp in a food processor and combine with the ground pork. Set aside. Heat 1 Tbsp. of oil in a wok or deep skillet on medium-high heat. Add the pork and shrimp mixture along with the minced ginger and garlic. Sauté for 2-3 minutes until it is mostly done. Use your spatula to break up the meat into small pieces.. Transfer to a plate. Add the remaining Tbsp. of oil to the wok. Add the carrots, cabbage, and green onions. Sauté for 2 minutes until vegetables soften. Add the pork and shrimp mixture back in. Add the oyster sauce, salt, sugar, and pepper. Stir to mix well. Spread the filling over a large baking sheet to cool for approximately 10 minutes. You do not want hot filling for your spring rolls. They will get soggy and difficult to roll. 2. Spring Roll-Making Station Set up your spring roll station. You want to have a large baking sheet to put your rolled up spring rolls. Have a light towel to cover them so they do not dry out while you are rolling the rest of the spring rolls. Have your spring roll wrappers ready and covered with a towel. Spring roll wrappers are very thin and can dry out quickly. Covering them with a towel will keep them moist and pliable. Scoop your cooled filling into a bowl. Lightly beat the egg in a small bowl and have it near your spring roll station with a pastry brush. 3. Rolling Spring Rolls Take one spring roll wrapper and lay it on the counter in a diamond shape with the corner pointed at you. Scoop about 2 Tbsp. of filling and place it on the bottom third of the wrapper. Gently fold over the bottom corner and start rolling your spring roll. When you get to the center (halfway) of the wrapper, stop. Fold in the left and right sides of the wrapper towards the center. Brush the top corner of the wrapper with the egg wash to help seal it tightly. Finish rolling the spring roll and place on the baking sheet, seam side down. Cover with the towel to keep moist. Repeat the process with the remaining wrappers and filling. 4. Cooking Spring Rolls Line a large baking sheet with paper towels to absorb the excess oil from the spring rolls. Fill a small stockpot or 2 qt. saucepan with about 2” of high temperature cooking oil. Or if you have a deep fryer, you can use that. Heat the oil over medium-high heat for several minutes. To test if the oil is hot enough, stick a bamboo skewer or chopstick into the oil. If you see tiny bubbles rapidly bubbling around the skewer, it is ready for frying. Using a pair of tongs, gently add 3-5 spring rolls into the hot oil. Fry for 3-4 minutes until they are evenly browned. Don’t overcrowd the pot, you do not want the oil to cool down and absorb into the spring rolls. Once the spring rolls are golden brown, remove them and place them on the paper towels to drain. If the spring rolls appear to be browning very quickly, reduce heat slightly. Continue frying the remaining spring rolls and draining on the paper towel lined baking sheet. Serve with your favorite sweet chili sauce! notes You can add bean sprouts or chopped water chestnuts for additional crunch. If you wish, you can use all pork or all shrimp instead of a mixture. This recipe easily doubles if you want to make a large amount for a party. Spring roll wrappers are found in the frozen section at Asian supermarkets. You can use the smaller 5” wrappers, just use 1 Tbsp. of filling instead of 2 Tbsp. Do not use the dried rice paper wrappers in the grocery stores! They are used for making fresh spring rolls and will not fry well at all! To Freeze: Spring Rolls freeze very well! Place fried spring rolls in the freezer on a baking sheet. Once frozen, they can be put in a ziploc bag and will keep for about 3 months. To Reheat: Preheat the oven to 350°F. Place spring rolls on a baking sheet and bake for 10-12 minutes or until hot. Serve with your favorite sweet chili sauce! Crispy, Chinese-style spring rolls filled with a savory pork and shrimp filling. Serve these at your next party! Better than takeout! You might also enjoy
